How to Build a Fire Pit in Your Garden (Simple DIY Guide)
")
Transforming your garden into an inviting outdoor living space starts with creating a stunning DIY fire pit. This weekend project can elevate your garden’s atmosphere, providing a warm gathering spot for family and friends throughout the year.
Building an outdoor fire pit is easier than you might imagine. With careful planning and the right approach, you can construct a beautiful garden fire pit that adds value to your property and extends your outdoor entertaining options.
Whether you’re a seasoned DIY enthusiast or a first-time home improver, this guide will walk you through each step of creating your perfect garden fire pit. From selecting the ideal location to choosing materials and ensuring safety, you’ll gain the confidence to tackle this exciting home improvement project.
Inhaltsverzeichnis
Key Takeaways
- A DIY fire pit can transform your garden’s functionality
- Proper planning is crucial for successful fire pit construction
- Safety should always be your primary consideration
- Basic DIY skills are sufficient to complete this project
- A garden fire pit increases outdoor living space value
- Weekend project with long-lasting enjoyment
Planning Your Garden Fire Pit Project
Creating a backyard fire pit requires careful planning and consideration. Your garden’s unique characteristics and local regulations will guide the design and placement of this exciting outdoor feature. A well-planned fire pit can transform your outdoor space into a welcoming gathering point for friends and family.
Designing the perfect fire pit starts with understanding several critical factors that will impact your project’s success. From selecting the ideal fire pit location to navigating safety requirements, each step plays a crucial role in creating a functional and enjoyable outdoor space.
Choosing the Right Location for Your Fire Pit
Selecting an appropriate fire pit location is fundamental to your project’s safety and enjoyment. Consider these key factors:
- Maintain at least 3 metres distance from house structures
- Keep 6 metres away from trees and overhanging branches
- Choose a level ground area with good drainage
- Consider wind direction to prevent smoke issues
- Ensure easy access from seating areas
Understanding Local Regulations and Safety Requirements
Before breaking ground, investigate your local fire pit regulations. UK councils have specific guidelines regarding open fires and outdoor structures. Key considerations include:
- Check local planning permissions
- Verify smoke control area restrictions
- Notify neighbours as a courtesy
- Review fire safety guidelines
Determining the Ideal Size and Style
Your fire pit design should complement your garden’s layout and intended use. Standard garden fire pits typically range from 90-120 cm in diameter. Consider these design options:
- In-ground versus above-ground configurations
- Circular or square structural designs
- Material choices: brick, stone, or concrete blocks
“A well-planned fire pit is not just a feature, but a focal point of outdoor entertainment.” – Landscape Design Expert
By carefully evaluating fire pit location, safety regulations, and design preferences, you’ll create a stunning and functional outdoor centrepiece that enhances your garden’s aesthetic and usability.
Essential Materials and Tools You’ll Need
Creating a stunning stone fire pit requires careful selection of the right materials and tools. Your fire pit project will succeed with proper preparation and quality supplies specifically designed for outdoor fire pit construction.

When selecting fire pit materials, focus on heat-resistant options that can withstand extreme temperatures. Standard building materials won’t cut it for your outdoor fire feature.
Recommended Fire Pit Materials
- Fire-resistant fire pit bricks
- Natural stone blocks
- Heat-resistant concrete pavers
- Landscape fabric
- Gravel for drainage
- Sand for levelling
Your fire pit construction requires specific tools to ensure precision and safety. Investing in quality equipment will make the building process smoother and more enjoyable.
Essential Tools for Your Project
- Spade for excavation
- Spirit level
- Tape measure
- String line and stakes
- Rubber mallet
- Wheelbarrow
- Safety gear (work gloves and protective eyewear)
Quantities matter when preparing for your stone fire pit. Typically, you’ll need approximately 80-120 fire bricks or blocks for a standard circular pit. Budget around 100-150kg of gravel and 50-75kg of sand to complete your project successfully.
Pro tip: Always purchase slightly more materials than you think you’ll need to account for cuts, breakages, and unexpected challenges.
By carefully selecting the right fire pit materials and gathering proper tools, you’ll set yourself up for a successful and satisfying DIY garden transformation.
Preparing the Ground and Creating a Solid Foundation
Creating a robust fire pit foundation is crucial for a successful DIY fire pit construction project. Your garden fire pit requires meticulous ground preparation to ensure stability and longevity. Proper planning will prevent future structural issues and make your outdoor space more enjoyable.

Before you build a fire pit, understanding the groundwork is essential. A well-prepared base will support your fire pit structure and provide a safe, level surface for enjoyment.
Marking Out Your Fire Pit Area
Precise area marking is the first step in fire pit construction. Follow these guidelines:
- Choose a level spot in your garden
- Use a central stake with attached string
- Mark the circumference using spray paint or sand
- Add an extra 15-20cm around the intended fire pit diameter
“Measure twice, dig once” – A golden rule for DIY fire pit projects
Excavating and Levelling the Base
Excavation requires careful attention to detail. Your fire pit foundation depends on proper ground preparation:
- Dig to a depth of 15-20cm
- Remove turf and topsoil completely
- Check levelness using a spirit level
- Create a slight central depression for drainage
After excavation, lay landscape fabric to suppress weeds. Add a 10-15cm gravel layer for drainage, topped with a 5cm compacted sand layer. This methodical approach ensures a stable and long-lasting fire pit foundation.
Step-by-Step Fire Pit Construction Process
Building a homemade fire pit requires careful planning and methodical execution. Your DIY fire pit project will transform your garden into a cosy outdoor gathering space, but success depends on following a structured approach to fire pit construction.

Before starting your fire pit build, gather all necessary tools and materials. Preparation is key to a smooth construction process.
- Conduct a final site inspection to ensure ground preparation is complete
- Check that your foundation is level and compact
- Verify all safety equipment is readily available
- Confirm you have protective gear such as gloves and safety glasses
Your fire pit construction will progress most efficiently when you work systematically. Take time to understand each step, avoiding rushed decisions that could compromise safety or structural integrity.
- Work during dry weather conditions
- Maintain a steady, patient pace
- Double-check measurements before cutting or placing materials
Typical DIY fire pit projects require approximately 6-8 hours of active work. Breaking the project into manageable stages helps prevent fatigue and ensures precision throughout the construction process.
Building the Fire Pit Walls and Structure
Creating the walls of your stone fire pit requires precision and careful planning. Your fire pit construction will determine the overall stability and appearance of your garden feature. This guide will walk you through the essential steps of building robust and attractive fire pit walls.

Laying the First Course of Bricks
The foundation of your fire pit is crucial for its long-term durability. When laying fire pit bricks, follow these key guidelines:
- Use a centre stake and string to maintain a perfect circular shape
- Ensure the ground is completely level before placing first bricks
- Leave small gaps between bricks for drainage and air circulation
- Check level in multiple directions using a spirit level
“A well-laid first course is the secret to a stable and beautiful fire pit” – Garden Design Expert
Stacking and Securing Layers
When you build fire pit walls, staggering joints between layers is essential for structural integrity. Aim to create a wall height of 30-45 cm, which typically involves 3-4 courses of standard blocks.
- Alternate brick placement to prevent continuous vertical joints
- Use fire-resistant mortar for permanent structures
- Maintain consistent spacing between stones or bricks
- Check circular alignment from the centre point regularly
Pro tip: For natural stone fire pit construction, select stones with relatively flat surfaces to ensure stable stacking.
Installing Proper Drainage and Ventilation

Creating a successful fire pit requires careful attention to drainage and ventilation. These critical elements ensure your DIY fire pit construction remains safe, functional, and long-lasting. Understanding how to manage water and air circulation will protect your investment and enhance your outdoor entertaining space.
Proper fire pit drainage prevents water accumulation that could damage your carefully built structure. Your initial gravel base plays a crucial role in water management. When constructing your fire pit, consider these essential drainage strategies:
- Create a slight slope in the base towards drainage points
- Leave small gaps between bricks in the lower courses
- Install weep holes in the bottom course if using mortar
Ventilation is equally important for fire pit performance. Optimal air circulation ensures efficient burning and reduces smoke production. The design of your fire pit’s lower courses should intentionally allow air intake, typically with 1-2 cm gaps between bricks.
“A well-ventilated fire pit is the secret to a cleaner, more enjoyable outdoor experience.”
When implementing fire pit ventilation, remember these key principles:
- Never completely seal the base of your fire pit
- Ensure consistent air circulation from below
- Consider metal vents for additional airflow in mortar-based designs
By prioritising both drainage and ventilation in your fire pit construction, you’ll create a robust outdoor feature that performs beautifully and stands the test of time.
Finishing Touches and Safety Features
Transforming your outdoor fire pit from a basic structure to an inviting garden feature requires careful attention to final details. The right finishing touches not only enhance safety but also create a welcoming atmosphere for your garden fire pit.

Adding a Fire Pit Liner for Protection
A fire pit liner is crucial for protecting your carefully constructed outdoor fire pit. These protective layers shield your masonry from intense heat, preventing cracking and extending the pit’s lifespan.
- Choose stainless steel or heavy-gauge metal liners
- Select a liner 5-10cm smaller than your pit’s interior
- Install on a bed of sand for stable positioning
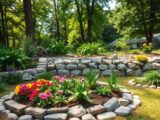
Designing Your Fire Pit Seating Area
Creating the perfect fire pit seating area involves more than just placing chairs around your outdoor fire pit. Safety and comfort are paramount when designing this social space.
| Seating Option | Pros | Considerations |
|---|---|---|
| Built-in Stone Benches | Permanent, matches pit design | Less flexible, requires more construction |
| Movable Outdoor Furniture | Flexible arrangement | Must be weather-resistant |
Ensure a minimum of 1.5 metres between seating and the fire pit for optimal comfort and safety. Consider additional elements like pathway lighting and decorative edging to complete your garden fire pit area.
A well-designed fire pit seating area transforms your garden into an enchanting outdoor living space.
Maintaining Your Garden Fire Pit Throughout the Year

Proper fire pit maintenance is crucial for ensuring your outdoor fire pit remains a safe and beautiful feature of your garden for years to come. Regular care will protect your DIY fire pit investment and keep it looking pristine through changing seasons.
Your garden fire pit requires consistent attention to maintain its structural integrity and aesthetic appeal. Here are essential maintenance tasks to keep in mind:
- Always allow ashes to cool completely for at least 24 hours before removal
- Dispose of cooled ashes in a metal container away from flammable materials
- Inspect for loose bricks or stones after each use
- Check for heat-related expansion or structural changes
Seasonal maintenance plays a critical role in preserving your outdoor fire pit. During spring, conduct a thorough inspection to identify any winter-related damage. Look for:
- Frost damage in mortar joints
- Potential cracking in stones or bricks
- Accumulated debris or unwanted vegetation
Annual deep cleaning is essential for fire pit maintenance. Use a wire brush to remove soot and creosote buildup, and carefully inspect all structural components. In regions with harsh winters, consider using a breathable cover to protect your fire pit during prolonged non-use periods.
Safety should always be your priority. Regularly check that the area surrounding your fire pit remains clear of flammable materials, and ensure you have a water source or fire extinguisher nearby for emergencies.
Conclusion
Building a DIY fire pit transforms your garden into an enchanting outdoor living space. Your newly constructed garden fire pit represents more than just a weekend project—it’s a gateway to creating memorable experiences with family and friends. By carefully following the steps outlined in this guide, you’ve successfully navigated the process of creating a safe and stylish outdoor fire pit.
Safety remains paramount when enjoying your new outdoor fire pit. Always keep a fire extinguisher nearby, maintain safe distances from structures, and adhere to local regulations. Selecting the right location and using proper materials ensures your DIY fire pit becomes a reliable centrepiece for garden gatherings. Start with smaller fires as you become familiar with your new feature, using well-seasoned hardwood to minimise smoke and maximise enjoyment.
Your garden fire pit offers versatility beyond simple warmth. It can serve as a focal point for landscaping, a gathering space for social events, and a source of ambient lighting during evening entertaining. The investment of time and effort in constructing this outdoor feature will provide years of pleasure, potentially increasing your property’s aesthetic and monetary value.
Remember that each fire pit is unique, reflecting the personality and creativity of its builder. Your personal touches—whether through surrounding stonework, seating arrangements, or decorative elements—will make this outdoor fire pit truly yours. Embrace the craftsmanship of your DIY project and enjoy countless evenings of warmth, light, and shared memories in your beautifully transformed garden space.
FAQ
How long does it take to build a fire pit?
Typically, a DIY fire pit project takes approximately 6-8 hours of active work, usually spread across a weekend. The total time can vary depending on your skill level, chosen design, and site preparation requirements.
Do I need planning permission to build a fire pit in my garden?
You should check with your local council regarding specific regulations. In most cases, a small garden fire pit is permitted, but you must comply with local planning guidelines, especially in smoke control areas or if you have close neighbours. Always ensure you’re not causing a nuisance and maintain appropriate distances from structures.
What materials are best for building a fire pit?
Use fire-resistant materials such as fire bricks, concrete blocks, or natural stone specifically designed to withstand high temperatures. Avoid standard house bricks, as they can crack or explode under intense heat. Recommended materials include heat-resistant pavers, fire-rated blocks, and purpose-made fire pit stones.
How far should a fire pit be from my house and other structures?
Maintain a minimum distance of 3 metres from your house, fences, and other structures. Additionally, keep at least 6 metres clear from overhanging trees or branches to prevent potential fire risks and ensure safe operation.
What safety equipment should I have when using my fire pit?
Essential safety equipment includes a fire extinguisher, bucket of water, garden hose, fire-resistant gloves, and a long-handled poker. Always keep a first aid kit nearby and ensure you have a clear area around the fire pit free from flammable materials.
How do I maintain my fire pit throughout the year?
Regular maintenance involves removing ash completely after cooling (at least 24 hours), checking for loose stones or bricks, cleaning with a wire brush annually, and inspecting for any structural damage. During winter, ensure proper drainage to prevent frost damage and consider using a breathable cover.
What type of wood should I use in my fire pit?
Use seasoned hardwoods like oak, ash, or beech that have been dried for at least 12 months. These woods burn more efficiently, produce less smoke, and provide longer-lasting heat. Avoid using treated wood, painted timber, or green (freshly cut) wood, which can create excessive smoke and potentially release harmful chemicals.
Can I use my fire pit during all seasons?
While you can use your fire pit year-round, be mindful of weather conditions and local regulations. Ensure proper drainage, avoid using during extremely wet or windy conditions, and be considerate of neighbours. In winter, take extra precautions to protect the fire pit from frost and moisture damage.
How deep should I dig for the fire pit foundation?
Excavate to a depth of 15-20 cm for the foundation layer. This allows space for a gravel drainage base (10-15 cm) and a sand levelling layer (5 cm). The precise depth may vary slightly depending on your specific ground conditions and chosen design.
What is the ideal size for a garden fire pit?
A standard garden fire pit typically ranges from 90-120 cm in diameter. The ideal size depends on your available space, garden layout, and intended use. Ensure the fire pit is proportionate to your garden and allows sufficient seating area around it.